Irresistible Cherry Muffins Recipe for the Perfect Summer…
The Secret to the Fluffiest Cherry Muffins You’ll Ever Make
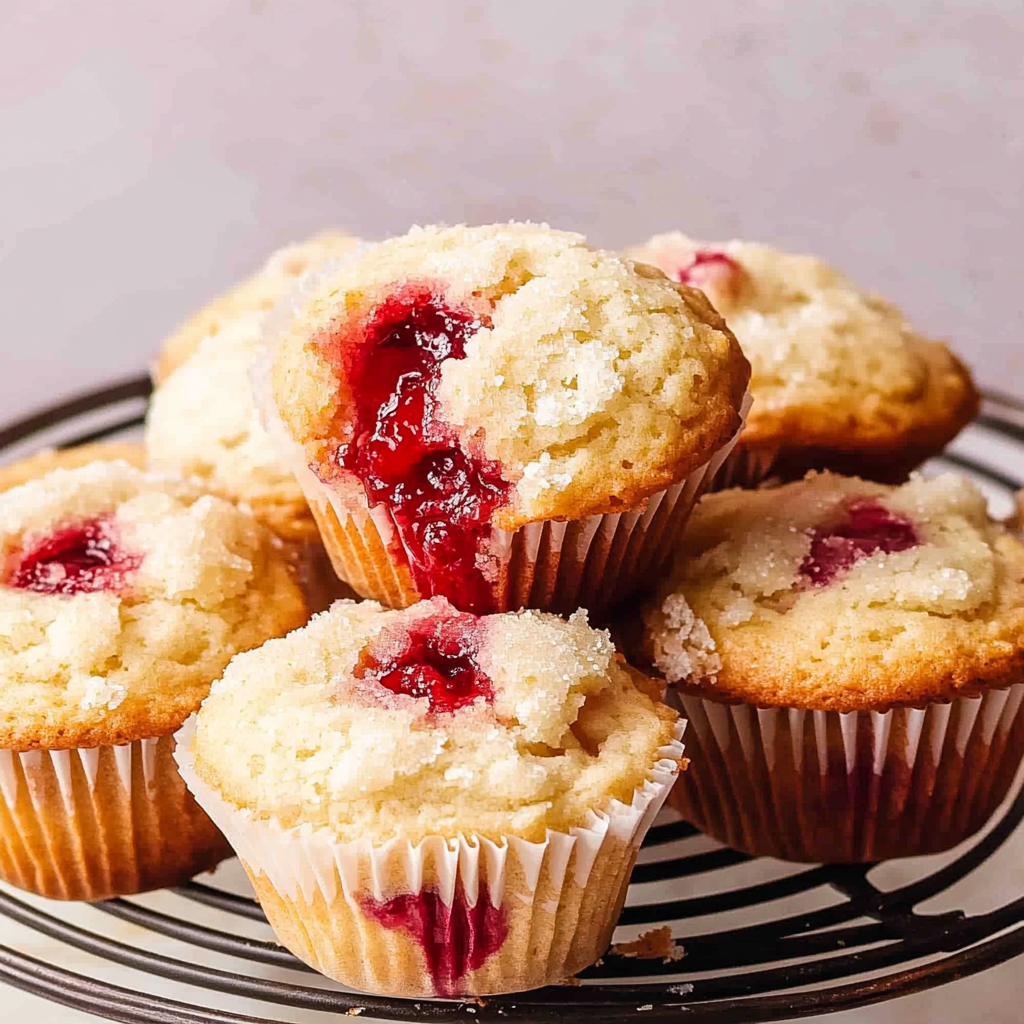
If you’re looking for the ultimate summer treat, this Cherry Muffins Recipe will be your new go-to. Imagine biting into a soft, moist muffin bursting with sweet, ripe cherries and topped with a delightful crunchy sugar coating. These muffins are perfect for breakfast or as a snack throughout the day, and they’re so easy to make that you’ll wonder why you didn’t try them sooner!
Why You’ll Love This Cherry Muffins Recipe
– Quick and easy preparation in just under an hour.
– Soft and fluffy texture that melts in your mouth.
– Bursting with fresh cherry flavors in every bite.
– Perfectly sweet with just the right amount of crunch from the sugar topping.
– Versatile enough to enjoy for breakfast, brunch, or as a dessert.
Preparation Phase & Tools to Use
To get started on these delicious muffins, you’ll need a few essential kitchen tools.
– Mixing bowls: A set of mixing bowls for combining your dry and wet ingredients.
– Whisk: To ensure all your ingredients are well combined without lumps.
– Muffin pans: Essential for baking the muffins; consider using one with cupcake liners for easy removal.
– Cookie scoop: Perfect for portioning out uniform muffin batter into the pans.
– Oven thermometer: To ensure your oven is at the correct temperature for baking.
Preparation Tips
For the best results, make sure all your ingredients are at room temperature before you start mixing. Allowing the batter to rest in the fridge is crucial for achieving that bakery-style height in your muffins. Don’t forget to gently fold in the cherries to avoid breaking them apart, which keeps those lovely fruit chunks intact!
Ingredients for this Cherry Muffins Recipe
Dry Ingredients
– 2 cups (240 g) all purpose flour
– 2 teaspoons baking powder
– ½ teaspoon salt
Wet Ingredients
– ½ cup (113 g) unsalted butter, melted
– 1 cup (200 g) sugar
– 2 large eggs, room temperature
– 1 teaspoon vanilla extract
– ½ cup (120 g) sour cream, room temperature
– ½ cup (120 ml) milk, room temperature
Add-ins
– 2 cups fresh or frozen cherries, pitted and chopped
Topping (optional)
– ¼ cup (50 g) coarse sugar for topping
Cherry Muffins Recipe
Are you ready to indulge in a delightful treat that screams summer? These cherry muffins are the perfect way to enjoy ripe, juicy cherries in a soft, fluffy muffin. Whether you’re looking for a sweet breakfast or a yummy snack, this cherry muffins recipe is sure to please your taste buds and brighten your day. Let’s dive into this easy-to-follow recipe that will have you baking like a pro in no time!
Step-by-Step Instructions
Step 1: Prepare the Dry Ingredients
In a mixing bowl, whisk together 2 cups of all-purpose flour, 2 teaspoons of baking powder, and ½ teaspoon of salt. This step is crucial as it ensures that the leavening agent is evenly distributed throughout the flour. Set this bowl aside for now; we will be coming back to it shortly.
Step 2: Mix the Wet Ingredients
In another bowl, combine ½ cup of melted unsalted butter with 1 cup of sugar, and whisk them together until well mixed. Add in 2 large eggs (make sure they are at room temperature!), 1 teaspoon of vanilla extract, ½ cup of sour cream (also at room temperature), and ½ cup of milk. Continue whisking until everything is beautifully integrated.
Step 3: Combine Wet and Dry Ingredients
Now it’s time to bring the two mixtures together! Gently stir the dry ingredients into the wet mixture until just combined. Be careful not to overmix—this can lead to dense muffins. Once combined, cover the bowl with plastic wrap and place it in the fridge for anywhere from 30 minutes up to overnight. This resting period allows the flavors to meld and improves the texture.
Step 4: Preheat Your Oven
While your batter rests in the fridge, go ahead and preheat your oven to 375°F (190°C). This ensures that when your muffins go in, they’ll bake evenly and rise beautifully. Don’t forget to line your muffin pans with cupcake liners! For those taller bakery-style muffins, alternate every other cup with liners for optimal results.
Step 5: Prepare the Cherries
Before we bake those lovely muffins, let’s get our cherries ready! If you have fresh cherries, wash them thoroughly, dry them off, pit them, and then chop them into smaller pieces. If you’re using frozen cherries, there’s no need to thaw them; just chop them while still frozen. When you’re ready, fold these cherry pieces into your rested batter gently.
Step 6: Scoop Into Muffin Liners
Using a 3-tablespoon cookie scoop (or just a spoon if that’s what you’ve got), fill each muffin liner with batter—remember to alternate every other cup if you want that charming bakery look! If you’re feeling a bit indulgent, sprinkle some coarse sugar on top for an added crunch before popping them into the oven.
Step 7: Bake and Cool
Bake those delightful cherry muffins for about 18-22 minutes or until they are golden brown and a toothpick inserted comes out with just a few moist crumbs attached. Once baked, allow them to cool in the pan for about five minutes before transferring them to a wire rack or plate to cool completely.
Notes
These cherry muffins are incredibly versatile! You can easily substitute different fruits based on what’s in season or what you have on hand—think blueberries or raspberries! Want to add some protein? Consider mixing in some chopped nuts or even chocolate chips for extra flavor. To elevate these muffins further, try adding spices like cinnamon or nutmeg for warmth or zesting some lemon into your batter for a refreshing twist.
Watch Out for These Mistakes While Cooking
– Using cold ingredients straight from the fridge instead of letting them reach room temperature.
– Overmixing the batter which can lead to tough muffins.
– Forgetting to preheat the oven before putting your muffins in.
– Not allowing enough time for resting; this step makes a big difference!
– Skipping lining the muffin pans which can make cleanup messy.
Storage Instructions
To store any leftovers (though I doubt there will be many!), place your cooled cherry muffins in an airtight container at room temperature for up to three days. For longer storage, feel free to freeze them! Just make sure they are completely cooled before wrapping them tightly in plastic wrap and placing them in freezer bags. When you’re ready to enjoy one again, simply thaw at room temperature or pop one in the microwave for about 20 seconds.
Estimated Nutrition
– Calories: Approximately 210 per muffin
– Protein: About 3g
– Fat: Roughly 8g
– Carbohydrates: Around 33g

Frequently Asked Questions
Can I use frozen cherries?
Absolutely! Frozen cherries work perfectly fine in this recipe without needing thawing beforehand.
How do I know when my muffins are done?
You can tell when they’re done by inserting a toothpick into the center; it should come out with just a few moist crumbs attached rather than wet batter.
Can I make these gluten-free?
Yes! You can substitute all-purpose flour with a gluten-free blend designed for baking; just keep an eye on consistency as gluten-free flours can vary greatly.
Conclusion
I hope you’re feeling inspired by this cherry muffins recipe! There’s nothing quite like enjoying warm muffins straight from the oven filled with sweet cherries—the perfect way to start your day or enjoy as an afternoon treat. I would love for you to try these out and share your thoughts on how they turned out. Happy baking!
Cherry Muffins
Ingredients
Method
- In a mixing bowl, whisk together the flour, baking powder, and salt. Set aside.
- In another bowl, combine melted butter and sugar, whisk until mixed. Add eggs, vanilla, sour cream, and milk, whisk until integrated.
- Gently stir the dry ingredients into the wet mixture until just combined. Cover and refrigerate for 30 minutes to overnight.
- Preheat oven to 375°F (190°C) and line muffin pans with cupcake liners.
- Prepare cherries by washing, pitting, and chopping if fresh, or chop frozen cherries without thawing.
- Fill each muffin liner with batter using a cookie scoop, sprinkle coarse sugar on top if desired.
- Bake for 18-22 minutes until golden brown and a toothpick comes out with a few moist crumbs. Cool in the pan for 5 minutes before transferring to a wire rack.