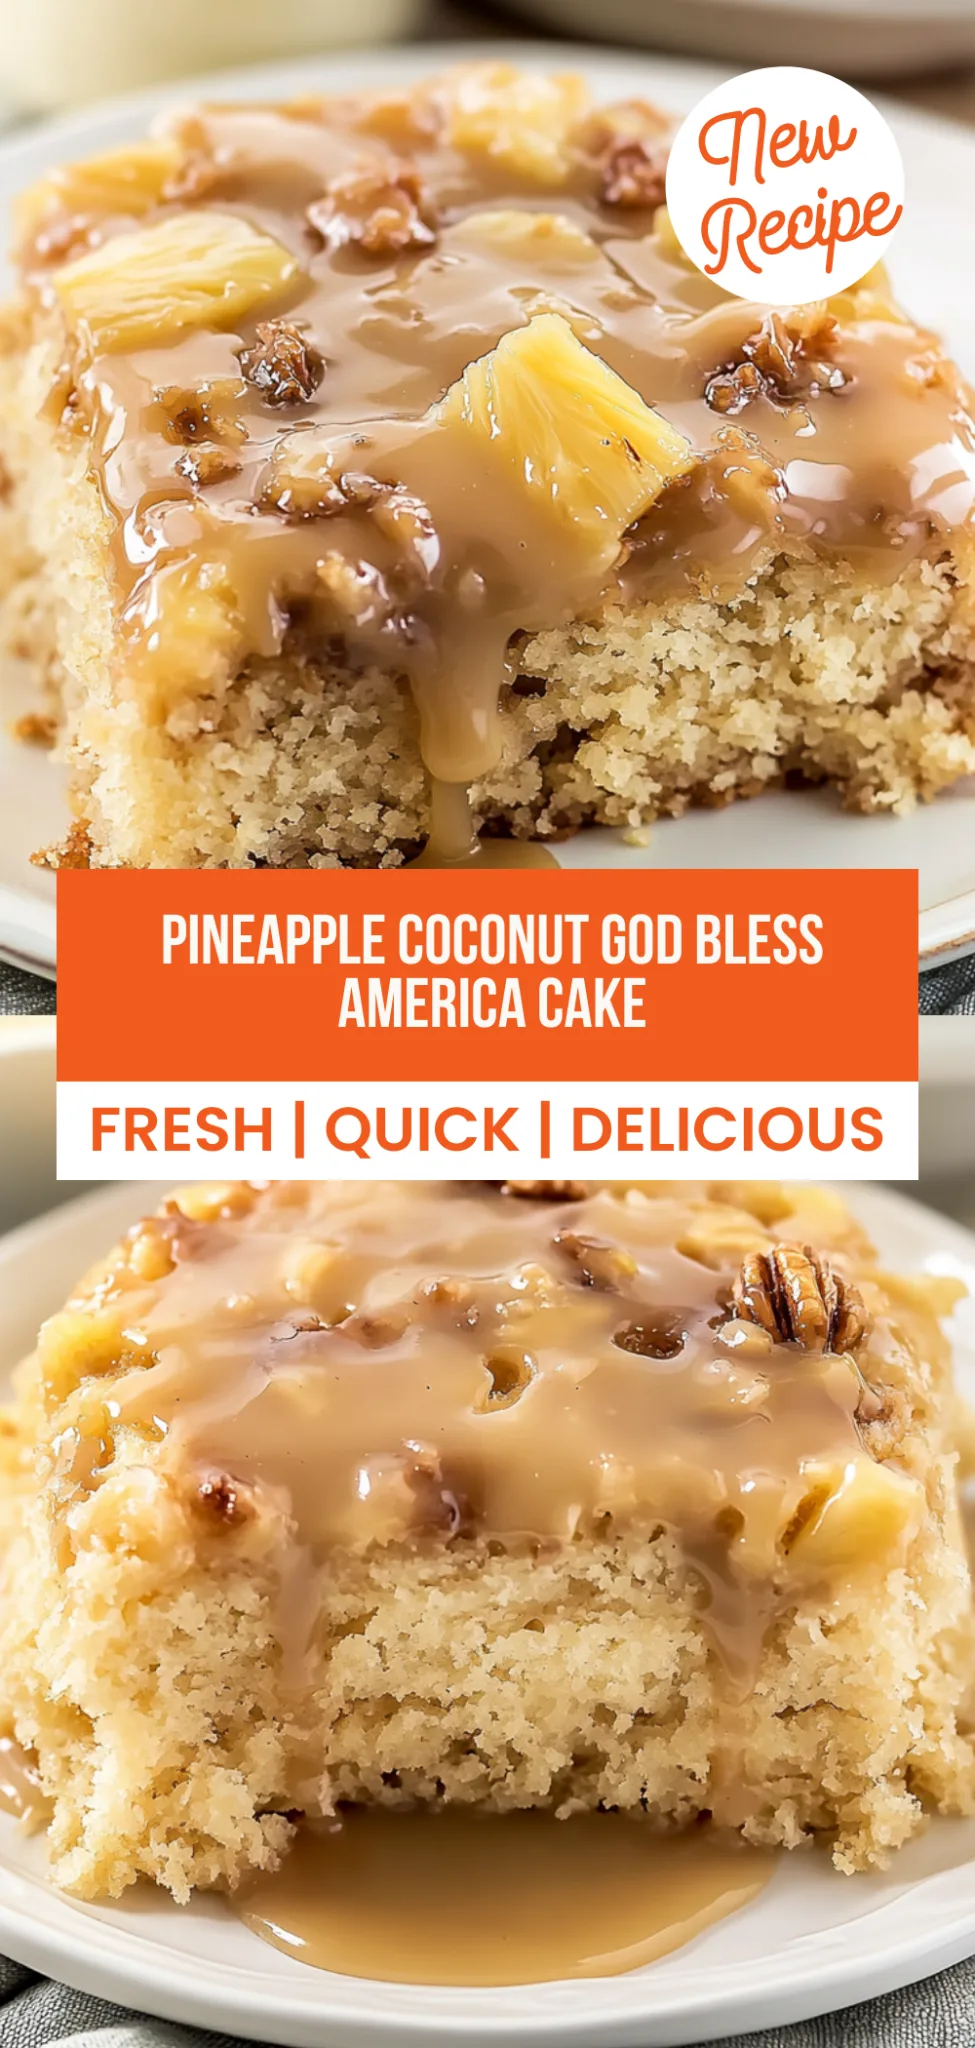
Pineapple Coconut God Bless America Cake: A Tropical Delight
When I first whipped up the Pineapple Coconut God Bless America Cake, I knew I was onto something special. Imagine slicing into a moist, fluffy cake that bursts with tropical flavors—sweet, vibrant pineapple mingling with creamy coconut, creating a flavor explosion that dances on your taste buds! This delightful cake not only satisfies your sweet cravings but also packs a punch with 350 calories per serving, making it an indulgent yet balanced treat. I created this recipe during a busy week when my family craved something fun and festive to celebrate our little victories.
The first time I made this cake was on the Fourth of July, a day filled with sunshine and laughter. As I pulled it from the oven, the aroma wafting through the house drew my teenage kids into the kitchen like moths to a flame. “Mom, is that what I think it is?” my son exclaimed, his eyes wide with excitement. The twist? A layer of shredded coconut baked right into the batter gives it a unique texture that sets it apart from any other cake I’ve made. After the first bite, my daughter asked for seconds and declared it her new favorite dessert—a moment I’ll cherish forever!
Ingredients for the Pineapple Coconut God Bless America Cake
Each ingredient in this dish plays an essential role in flavor and texture. Here’s what you’ll need:
- 2 cups all-purpose flour: Provides the structure and body for the cake.
- 1 cup granulated sugar: Adds sweetness and moisture to balance the flavors.
- 1 cup canned crushed pineapple (drained): Infuses a juicy tropical flavor and keeps the cake moist.
- 1/2 cup unsweetened shredded coconut: Contributes a chewy texture and rich coconut flavor.
- 1/2 cup unsalted butter (softened): Creates a tender crumb and adds richness.
- 1 cup buttermilk: Ensures a moist, tangy flavor that enhances the cake’s tenderness.
- 3 large eggs: Acts as a binder while adding richness and stability to the batter.
- 1 tablespoon baking powder: Provides leavening to help the cake rise beautifully.
- 1 teaspoon vanilla extract: Enhances overall sweetness with its warm, aromatic notes.
- 1/2 teaspoon salt: Balances sweetness and elevates all other flavors.
Step-by-Step Instructions
I recommend starting by preheating your oven to ensure it’s hot and ready when your cake batter is prepared — this way, everything bakes evenly and you won’t have to wait around.
Step 1: Preheat your oven to 350°F (175°C). While it’s heating, grease and flour two 9-inch round cake pans to ensure your cakes release easily after baking. This step is crucial because it prevents sticking, which can ruin the presentation of your beautiful layers.
Step 2: In a mixing bowl, cream together the softened butter and granulated sugar until light and fluffy. This usually takes about 3-5 minutes with an electric mixer. The goal here is to incorporate air into the mixture, which helps your cake rise beautifully, so don’t rush it!
Step 3: Add the eggs one at a time, mixing well after each addition, then stir in the vanilla extract. This method allows each egg to fully integrate into the batter for a smooth consistency. I usually crack my eggs into a separate bowl first to catch any shell fragments — trust me, it saves time later!
Step 4: In another bowl, combine the flour, baking powder, and salt. Gradually add this dry mixture to the butter mixture, alternating with the buttermilk. Begin and end with the flour mixture; this helps maintain a smooth batter without overmixing. As you mix, be careful not to overwork it — just combine until you see no dry flour remaining.
Step 5: Fold in the crushed pineapple and shredded coconut until just combined. Use a spatula to gently incorporate these ingredients; you want them mixed in without knocking out all that lovely air you’ve created in the previous steps. The tropical flavors will shine through once baked!
Step 6: Divide the batter evenly between the prepared cake pans. I recommend using a kitchen scale if you want precision; each pan should ideally hold about 20 ounces of batter for even baking.
Step 7: Bake for 25-30 minutes or until a toothpick inserted into the center comes out clean. Keep an eye on them during those last few minutes; ovens can vary slightly in temperature. You want your cakes golden brown on top with a springy texture when touched.
Step 8: Let the cakes cool in the pans for 10 minutes before turning them out onto wire racks to cool completely. This cooling period is vital — if you try frosting while they’re still warm, you’ll end up with melted frosting that slides right off!
Step 9: In a mixing bowl, beat together the softened cream cheese and butter until smooth. It’s important that both ingredients are at room temperature so they blend seamlessly without lumps. I like to use a paddle attachment for this step; it makes achieving that creamy consistency easier.
Step 10: Gradually add the powdered sugar, mixing until well combined. Start on low speed to avoid a cloud of sugar dust! Once combined, increase your mixer speed for about 1-2 minutes until it’s fluffy and light.
Step 11: Stir in the vanilla extract and milk until the frosting reaches your desired consistency. If it’s too thick for spreading smoothly, add more milk one tablespoon at a time — I find that adjusting gradually helps achieve that perfect velvety texture.
Step 12: Once the cakes are completely cool, place one layer on a serving plate. Make sure it’s level; if it’s domed on top, trim it slightly for stability when stacking.
Step 13: Spread a layer of frosting on top of the first cake layer using an offset spatula for even coverage. This tool is fantastic for getting into edges and corners neatly!
Step 14: Place the second cake layer on top and frost the top and sides of the entire cake. Take your time here; a smooth finish not only looks professional but also makes cutting easier later.
Step 15: Sprinkle the remaining shredded coconut on top of the frosted cake for decoration and added texture. You can press some lightly into the sides too; it gives that tropical feel we’re aiming for!
Step 16: Slice and serve the cake, enjoying those delightful tropical flavors! Each bite should be moist with bursts of pineapple and coconut goodness — perfect for any celebration!
What to Serve with Pineapple Coconut God Bless America Cake
This cake is already incredibly filling and balanced, but these sides add extra variety and nutrition to round out your meal perfectly.
Tropical Fruit Salad: A vibrant mix of fresh fruits like mango, kiwi, and berries tossed in a light lime dressing brings a refreshing contrast to the rich flavors of the cake. The natural sweetness and acidity from the fruit not only complement the pineapple and coconut but also add a boost of vitamins A and C, making it a healthy choice. My kids love this salad as a colorful addition to any celebration.
Coconut Quinoa Salad: This salad features fluffy quinoa mixed with shredded coconut, diced bell peppers, and a zesty lime vinaigrette. The slight nuttiness of quinoa pairs beautifully with the tropical notes of the cake while providing an additional 8 grams of protein per serving. It’s become a staple in our meal prep routine because it’s nutritious and keeps well throughout the week.
Avocado Lime Dip: Creamy avocados blended with lime juice, garlic, and cilantro create a smooth dip that offers healthy fats to balance out the sweetness of the cake. This dip serves as an excellent accompaniment for tortilla chips or veggie sticks, adding texture and richness that echoes the coconut flavor in the dessert. It’s always a hit at family gatherings where we want something tasty yet nutritious.
Garlic Butter Rice: Fluffy white rice sautéed in garlic and butter provides a comforting carb element that complements the cake’s tropical sweetness without overpowering it. The simple seasoning enhances the overall meal’s flavor profile while offering energy-boosting carbohydrates—perfect for those looking to refuel after an active day. We often make this rice when hosting friends since it’s easy to prepare in large batches!
Storage & Serving Tips
To store your Pineapple Coconut God Bless America Cake for meal prep, place the entire cooled cake in an airtight container and refrigerate it for up to 4 days. If you’ve already frosted the cake with the cream cheese frosting, it’s best to cover it with plastic wrap or a cake dome to prevent drying out. For optimal freshness, keep the shredded coconut topping (1 cup unsweetened shredded coconut) in a separate small container. This way, you can maintain its texture until serving.
When reheating your cake, it’s important to do so gently. Place slices of the cake in a preheated oven at 350°F for about 10 minutes to warm through without compromising texture. Avoid microwaving, as this will make the cake soggy and disappointing. If you have any leftover frosting, you can microwave it briefly for 15-20 seconds to soften it before spreading, but be cautious not to overheat.
Pro tip: To batch cook this delightful cake for the week, consider doubling the recipe on Sunday and portioning it into individual containers for easy grab-and-go treats. Family members can enjoy self-assembling their slices with fresh toppings like additional shredded coconut or a drizzle of honey. For variety throughout the week, try swapping out canned crushed pineapple (1 cup) with diced fresh mango or swapping buttermilk (1 cup) for yogurt for a tangy twist. To keep your frosting creamy and delicious during storage, consider adding an extra tablespoon of milk when mixing it; this helps maintain its texture even after refrigeration.
Conclusion
The Pineapple Coconut God Bless America Cake has become one of those recipes I make at least once a month because it’s genuinely delightful, offers 350 calories per slice, and brings a tropical vibe to any celebration. The key differentiator here is the use of canned crushed pineapple, which infuses the cake with incredible moisture and flavor that sets it apart from typical coconut cakes. Give this one a try this week. I promise it’ll become a regular rotation dessert in your house too.