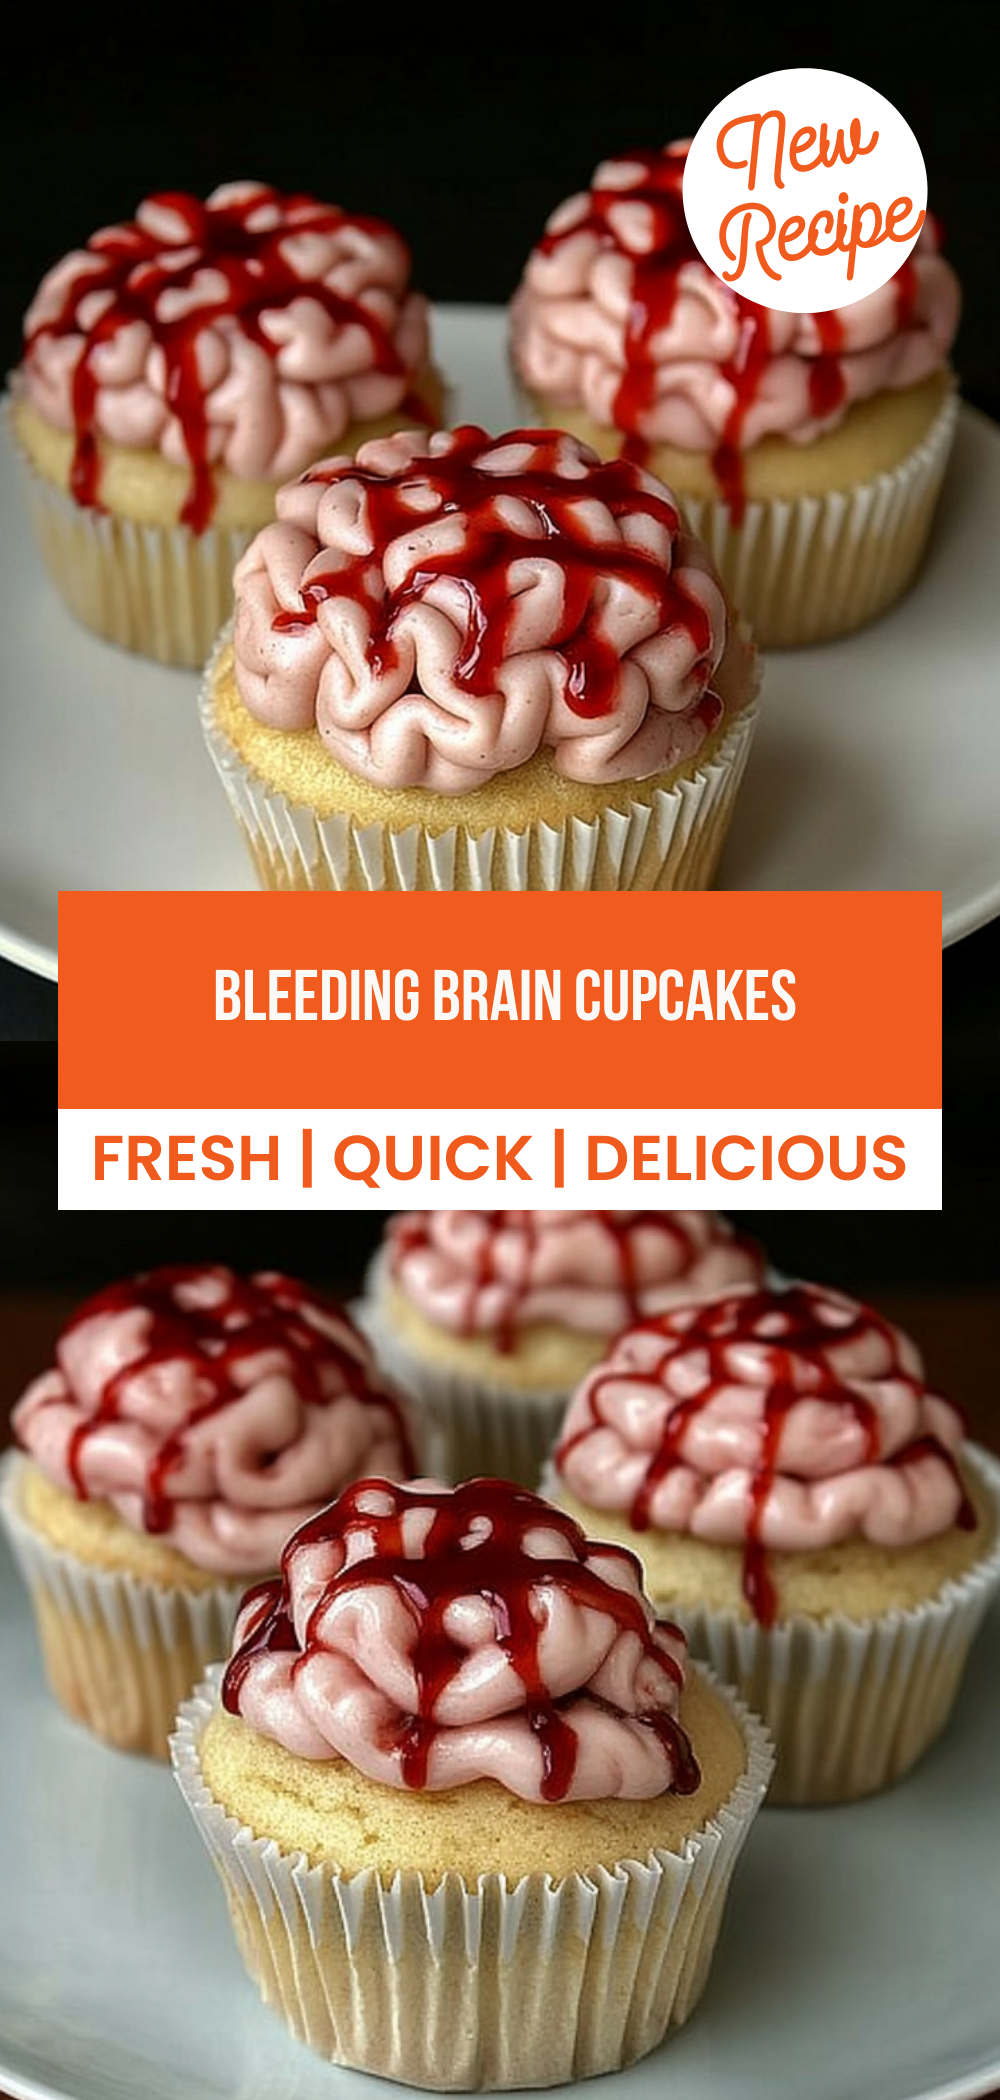
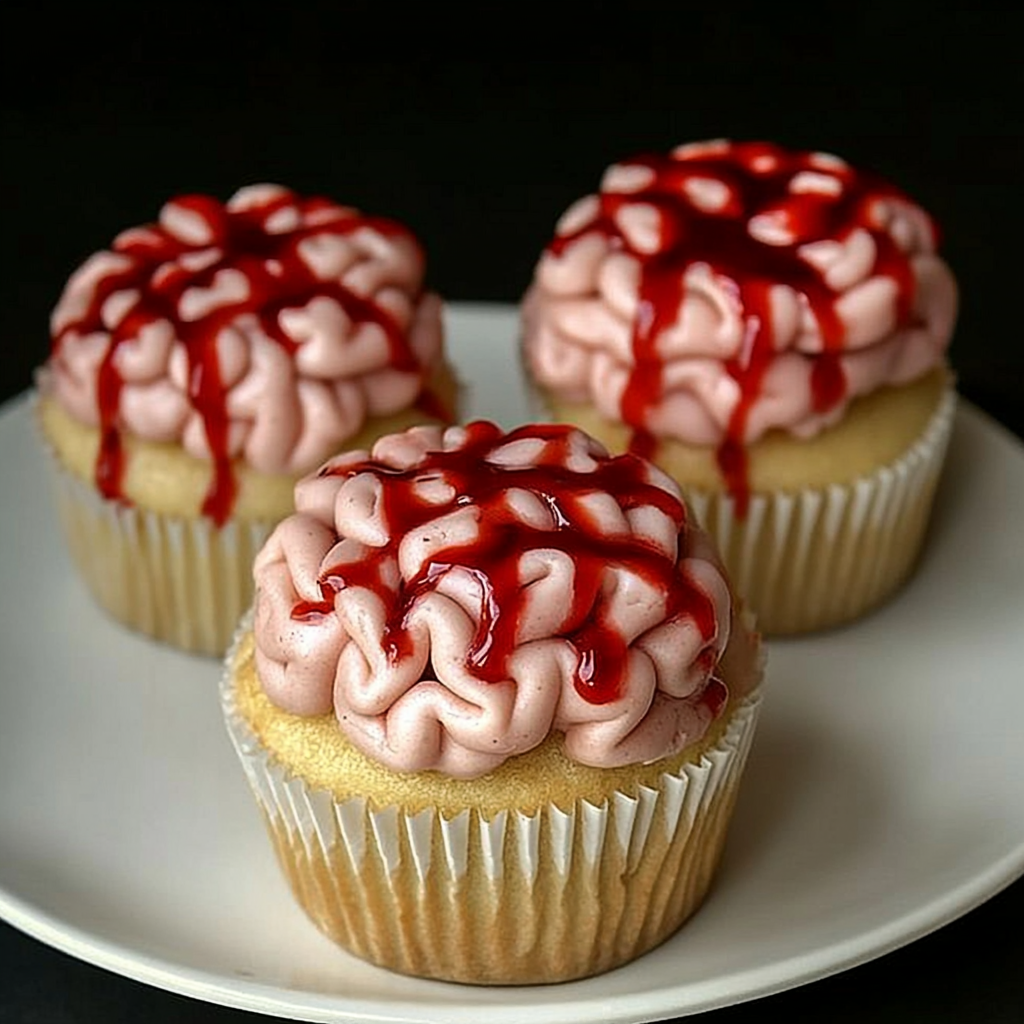
Spooktacular Bleeding Brain Cupcakes for Halloween Fun!
The Spookiest Treat: Bleeding Brain Cupcakes You Must Try!
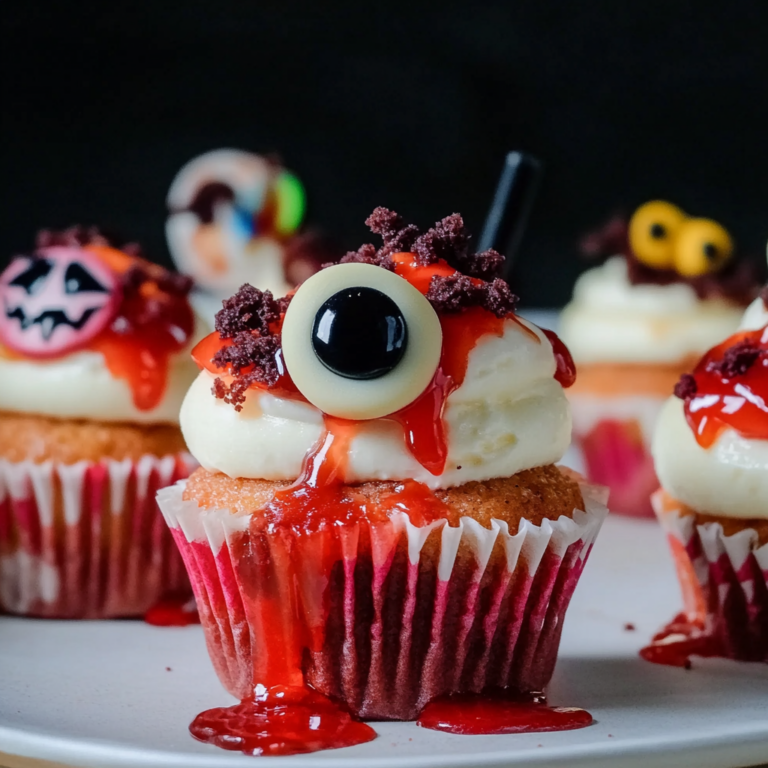
If you’re looking to add a deliciously creepy touch to your Halloween festivities, look no further than these Bleeding Brain Cupcakes. With their rich red velvet base, gooey jam filling, and whimsical pink frosting, these treats are as delightful to eat as they are to look at. The combination of flavors will have your guests raving about them long after the party is over. Plus, they’re surprisingly easy to make, ensuring that you won’t be stuck in the kitchen while everyone else enjoys the fun.
These cupcakes are not just about aesthetics; they pack a punch with their moist texture and vibrant flavors. The sweetness of the strawberry or raspberry jam complements the cocoa-infused cake perfectly, creating a delightful balance that is sure to please everyone’s palate. So roll up your sleeves and get ready for a spooky baking adventure with these amazing Bleeding Brain Cupcakes!
Why You’ll Love This Bleeding Brain Cupcakes
– Perfect for Halloween parties or themed events
– Moist and fluffy red velvet cake filled with delicious jam
– Eye-catching design that sparks conversation
– Easy to follow recipe for bakers of all skill levels
– Customizable with different jams or food colorings
Preparation Phase & Tools to Use
To create these spooky delights, you’ll need some essential tools in your kitchen arsenal:
– Mixing bowl: A medium-sized bowl is perfect for combining your cupcake batter.
– Electric mixer: Helps achieve a light and fluffy butter mixture effortlessly.
– Cupcake tin: Essential for shaping your cupcakes into their perfect form.
– Piping bag: Used for creating the brain-like frosting design on top of each cupcake.
– Cupcake corer or knife: For making space in the cupcake to fill with jam.
Preparation Tips
For the best results when making Bleeding Brain Cupcakes, ensure your butter is softened at room temperature before mixing for an airy texture. When adding food coloring, start with a small amount and gradually increase until you reach your desired shade. Allow the cupcakes to cool completely before filling them with jam to prevent melting the frosting.
Ingredients for this Bleeding Brain Cupcakes
##### For the Red Velvet Cupcakes
– 150 g Butter or baking spread (softened, unsalted)
– 150 g Caster sugar
– 2 Eggs (large)
– 1 tsp Vanilla extract
– 85 ml Buttermilk
– 165 g Self raising flour
– 1 1/2 tbsp Cocoa powder
– 1/2 tsp Bicarbonate of soda
– 1 tsp Red food colouring (I use Pro Gel or Sugarflair)
– 200 g Strawberry or Raspberry Jam
##### For the Pink Buttercream Frosting
– 200 g Butter (unsalted, softened)
– 400 g Icing sugar
– 1 tsp Vanilla extract
– 2 tbsp Milk
– Pink food colouring (I use Pro Gel or Sugarflair)
Bleeding Brain Cupcakes
Halloween is just around the corner, and what better way to celebrate than with these spooktacular Bleeding Brain Cupcakes? These delicious red velvet treats are not only visually striking but also filled with a sweet surprise. Imagine biting into a soft cupcake, only to discover a luscious jam filling oozing out—perfectly eerie for any Halloween gathering. Let’s dive into the step-by-step process to create these delightful goodies!
Step-by-Step Instructions
Step 1: Prepare Your Oven and Cupcake Tin
Begin by preheating your oven to 160C Fan/180C/350F/Gas Mark 4. While the oven is heating up, take a cupcake tin and line it with black cupcake cases. This will not only keep your cupcakes from sticking but will also add to the spooky aesthetic of your treats. Trust me; the darker color will make those vibrant red velvet cupcakes pop!
Step 2: Cream the Butter and Sugar
In a mixing bowl, whisk together 150g of softened butter and 150g of caster sugar until the mixture is fluffy and light. Using an electric mixer with a paddle attachment is ideal for this step, as it makes the process much easier and quicker. The goal here is to incorporate air into the mixture, which will help your cupcakes rise beautifully.
Step 3: Mix in Eggs and Vanilla
Once your butter and sugar are looking lovely, it’s time to add in two large eggs and one teaspoon of vanilla extract. Mix everything together until well combined. The eggs will add moisture and richness to your cupcakes while the vanilla brings that warm flavor we all love.
Step 4: Combine Wet and Dry Ingredients
Now, let’s bring everything together! Add 85ml of buttermilk, 165g of self-raising flour, 1½ tablespoons of cocoa powder, ½ teaspoon of bicarbonate of soda, and one teaspoon of red food coloring into the bowl. Mix until everything is just combined—be careful not to overmix! You want a smooth batter but don’t worry if there are a few lumps; they’ll bake out.
Step 5: Fill Your Cupcake Cases
Divide your batter evenly among the lined cupcake cases—aim for about two-thirds full for each case so they have room to rise without overflowing. Pop them in your preheated oven for about 20-25 minutes or until a skewer inserted in the center comes out clean. As they bake, enjoy the delightful aroma wafting through your kitchen!
Step 6: Cool Down Time
Once baked, transfer the cupcakes to a cooling rack and let them cool completely before moving on to the filling. This step is crucial because if you try to fill them while they’re still warm, you might end up with melted jam instead of that perfect ooze we’re going for.
Step 7: Core and Fill
When your cupcakes are fully cooled down, use a cupcake corer or a small knife to create a hole in the center of each one. Gently fill each hole with strawberry or raspberry jam using either a small spoon or piping bag. The jam serves as our “blood” filling that gives these cupcakes their fun name!
Notes
These Bleeding Brain Cupcakes are versatile in both flavor and presentation! Feel free to swap out the jam for any other fruit preserve you like—blueberry or cherry would be fantastic alternatives! If you’re looking for an extra flavor boost, consider folding in some finely chopped nuts or even chocolate chips into the batter before baking. And if you’re feeling adventurous, why not add some festive sprinkles or edible glitter on top?
Watch Out for These Mistakes While Cooking
– Using cold ingredients straight from the fridge can lead to uneven mixing.
– Overbaking can result in dry cupcakes—keep an eye on them!
– Not allowing enough time for cooling can cause messy fillings.
– Skipping the coring step means missing out on that gooey surprise.
Storage Instructions
Store any leftover cupcakes in an airtight container at room temperature for up to three days. If you want to keep them longer, consider freezing them! Just wrap each cupcake in plastic wrap before placing them in a freezer-safe container; they can last up to two months frozen. When you’re ready to enjoy them again, simply thaw at room temperature or pop them in the microwave for a few seconds.
Estimated Nutrition
– Calories: 456 kcal
– Protein: 3 g
– Fat: 25 g
– Carbs: 57 g
– Saturated Fat: 15 g
– Cholesterol: 91 mg
– Sodium: 273 mg
– Fiber: 1 g
– Sugar: 46 g
Frequently Asked Questions
Can I make these cupcakes ahead of time?
Absolutely! You can bake these cupcakes up to two days in advance. Just remember not to fill them with jam until you’re ready to serve so they stay fresh!
What if I don’t have buttermilk?
No worries! You can easily make your own buttermilk by adding one tablespoon of lemon juice or white vinegar into regular milk (about 85ml). Let it sit for about five minutes before using it in your recipe.
Can I use another type of food coloring?
Yes! While red food coloring gives that classic look for Halloween-themed treats, feel free to experiment with different colors based on your theme or occasion.
Conclusion
I hope you’re as excited as I am about making these Bleeding Brain Cupcakes! They’re sure to impress at any Halloween party while satisfying those sweet cravings too. Don’t forget to share your creations with me—I’d love to hear how yours turned out! Happy baking!
Bleeding Brain Cupcakes
Ingredients
Method
- Preheat your oven to 160C Fan/180C/350F/Gas Mark 4 and line a cupcake tin with black cupcake cases.
- Whisk together 150g of softened butter and 150g of caster sugar until fluffy and light.
- Add in two large eggs and one teaspoon of vanilla extract, mixing until well combined.
- Combine 85ml of buttermilk, 165g of self-raising flour, 1½ tablespoons of cocoa powder, ½ teaspoon of bicarbonate of soda, and one teaspoon of red food coloring into the bowl and mix until just combined.
- Divide the batter evenly among the lined cupcake cases, filling them about two-thirds full, and bake for 20-25 minutes.
- Transfer the cupcakes to a cooling rack and let them cool completely.
- Use a cupcake corer or a small knife to create a hole in the center of each cupcake and fill with strawberry or raspberry jam.